A 5-Day Student Guide for High School Computer Science Programs
Classroom Note: Complete each day in order. Add screenshots, photos, and file details to your Digital Notebook entry so your teacher can review your progress.
Digital Notebook: Your Digital Notebook is your daily learning log. At the end of each class, click Copy Day Notes and paste your responses into that day’s notebook entry (Day 1, Day 2, etc.) so you can track
your growth and submit complete evidence of learning.
Keyboard shortcuts: ← Previous day, → Next day
Accessibility tip: Use Tab to move between controls, arrow keys to change days, and switch to High Contrast for stronger readability.
I can explain additive vs. subtractive manufacturing in 1–2 clear sentences.
I can identify at least 5 printer components and describe each function accurately.
I can complete all Day 1 evidence tasks and submit all required work.
Steps
Instructional Flow: Learn (video/resources) → Practice (Day 1 tasks) → Submit (Before You Submit Checklist + Copy Day Notes).
Step 1: Watch Intro Video (8 min) Assignment: Watch the How 3D Printers Work warm-up video, then complete
Video Connection Prompts and Check for Understanding (Video
Transcript).
Step 2: Locate and Identify Parts (10 min) Assignment: Complete
Timed Component Hunt (3–5 Minutes), then complete Printer Anatomy
Check for key parts (nozzle, bed, AMS, touchscreen, frame/gantry). Use the Bambu Academy Components Reference and AMS Guide while locating parts.
Step 3: Observe Demo Print (10 min) Assignment: Observe a demonstration print and complete the Demo Observation Log, then review spool loading with the Load a Spool Guide.
Step 4: Complete and Submit Day 1 Tasks (17 min) Assignment: Complete the remaining Day 1 tasks (Safety & Setup Checklist, Reflection, and Exit Ticket), then finish the Beginner Bambu Lab course module. Finally, click
Copy Day Notes and paste into your Digital Notebook Day 1 entry.
Deliverable: Completed Day 1 tasks and labeled photo of printer setup.
Day 1 Activity Log
Guidance: Use complete sentences. Include one safety detail and one real observation from class in your answers.
Word Bank (Support)
Additive: building by adding material layer by layer
Subtractive: shaping by removing material
Slicing: splitting a digital model into printable layers
Nozzle: heated tip that extrudes filament
AMS: system that manages filament feeding/material options
Gantry: frame/motion system guiding print head movement
Timed Component Hunt (3–5 Minutes)
Before writing part functions, physically point to each part on the printer. Have a partner or teacher initial when complete.
Part
Located? (Yes/No)
Partner/Teacher Initials
Nozzle
Print Bed
AMS
Touchscreen
Frame / Gantry
Video Connection Prompts
Use key terms from the video: additive, subtractive,
digital model, slicing, and layers.
Reference the “icing on a cake” example when explaining layer-by-layer printing.
Prompt from Video
Your Response
What is the difference between a subtractive process and an
additive process?
Explain how the printer builds an object layer by layer (use the cake icing comparison).
According to the video, how does a digital model become print instructions?
Name two materials or real-world products mentioned in the video.
What is the AMS on a Bambu printer, and how can it help during a print job?
Check for Understanding (Video Transcript)
Answer using details from the Day 1 video transcript. Be specific and use key vocabulary when possible.
Question
Your Answer
According to the transcript, which process builds an object by
adding material in layers?
In subtractive manufacturing, what happens to the starting material?
What does slicing do to a digital model before printing starts?
What comparison from the transcript helps explain layer-by-layer printing?
Name one real-world product or use case mentioned in the transcript for 3D printing.
Demo Observation Log
Sentence starters: “I noticed…”, “This matters because…”, “I still wonder…”
What I Observed
Why It Matters
Question I Still Have
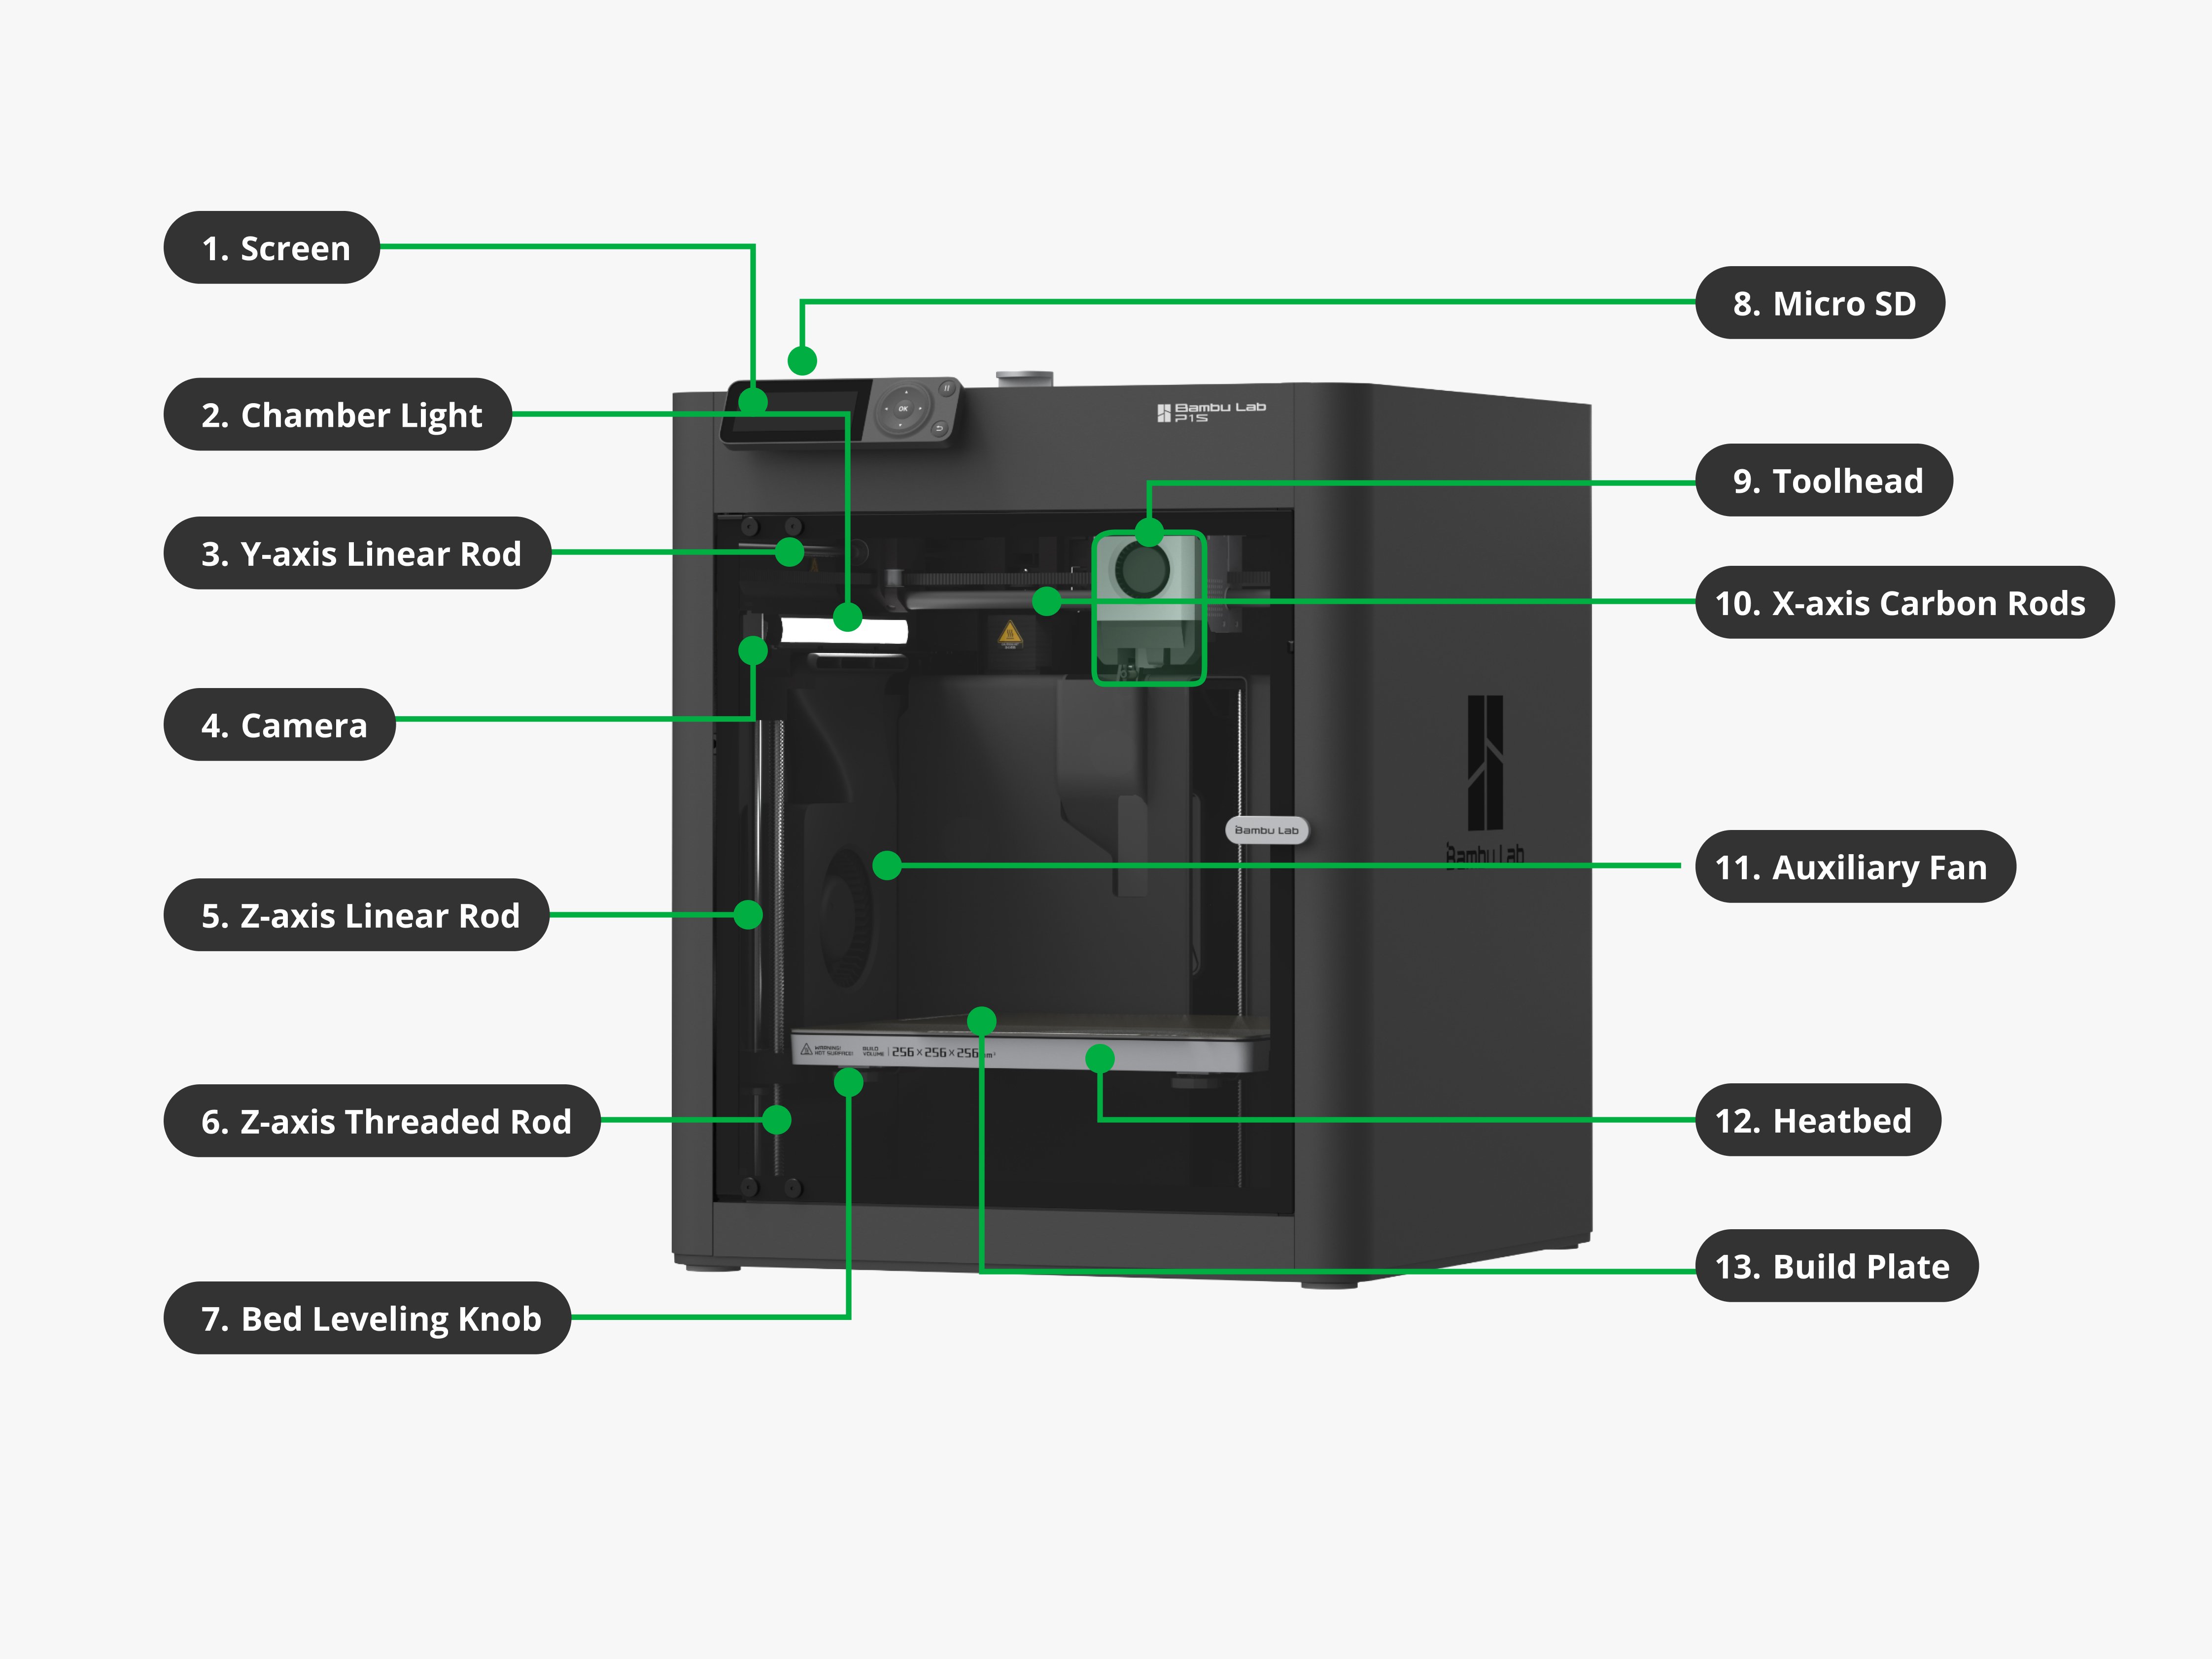
Printer Anatomy Check
Match each row to the exact label wording shown on the provided diagram.
Add one note about how the part affects print quality or safety.
Connect at least one part to the video (for example: nozzle extrudes material, slicer tells where each layer goes).
Use this diagram to identify parts and explain each part’s function in your own words. If the image does not load, open it directly:
Bambu Parts Diagram.
Use the numbered callouts below to match the labels on the image, then write each part’s function.
Callout 1: Nozzle
Callout 2: Print Bed
Callout 3: AMS (Automatic Material System)
Callout 4: Touchscreen
Callout 5: Frame / Gantry
Callout 6: Filament
Safety & Setup Checklist
Reflection
1. What idea from the intro video helped you understand 3D printing the most, and why?
2. Using the video, explain how slicing and the nozzle work together to create a final model.
Exit Ticket Rubric
Criteria
Beginning
Proficient
Advanced
Additive vs. Subtractive
Definition incomplete or unclear
Correct comparison with basic detail
Accurate comparison with strong example
Slicing Explanation
Minimal or incorrect process steps
Correctly explains model-to-layers process
Explains process and why it affects print quality
Component Function Accuracy
Part/function mismatch or vague
Mostly accurate part/function description
Accurate description with quality/safety connection
Exit Ticket (End of Day 1)
Exit Question
Your Answer
In one sentence, define additive manufacturing.
What does slicing do before a print starts?
Name one printer part and describe its job.
What is one safety rule you followed today?
Extension (Optional Challenge)
How might AMS improve workflow, reliability, or material use in a classroom 3D printing lab?
Goal: Create a custom 3D model using Tinkercad and prepare it for slicing.
Quick laugh: If your text is super tiny, your printer might treat it like a secret and hide it.
Objectives
Create a print-ready model with appropriate thickness and dimensions (
Evidence: Design Checklist).
Use basic design rules for successful 3D printing (
Evidence: Design Idea + Sketch/Outline).
Export and submit a valid STL file with supporting evidence (
Evidence: Submission checklist + reflection).
Success Criteria
I can explain my design purpose, size, and print limits.
I can produce an STL that matches classroom print requirements.
I can correctly submit both the STL and screenshot evidence.
Steps
Instructional Flow: Learn (tutorial/resources) → Practice (Day 2 activity log) → Submit (Before You Submit Checklist + Copy Day Notes).
Step 0: Watch TinkerCad Introduction Video (5 min) Assignment: Watch this video for a quick introduction to TinkerCad
before you start designing.
Step 1: Access Tinkercad (8 min) Assignment: Go to Tinkercad.com and log in with your school Google account. If you need a
quick platform tour, watch this Tinkercad Tutorial.
Step 2: Build Your Model Draft (15 min) Assignment: Create a name tag or keychain (3 mm thick, text raised at least 1 mm), then complete ProjeSSct Name,
Describe your design idea, and Sketch or outline your idea. Watch this How to Make a Keychain in Tinkercad video if you need a walkthrough. For adding a key ring and letters, use this Tinkercad key ring + letters tutorial.
Need an example? View this example keychain model.
Step 3: Verify Design Readiness (5 min) Assignment: Get a teacher or peer design check, then complete Design Checklist (confirm flat base, readable details, and size limits).
Step 4: Export STL (5 min) Assignment: Export your model as an STL file.
Step 5: Document and Submit Day 2 Work (7 min) Assignment: Complete
Reflection, then insert your STL filename/link and screenshot in your Digital Notebook Day 2 entry and finish
Before You Submit Checklist. STL note: upload file to Google Classroom,
log filename/link in Notebook.
Deliverable: STL filename/link and screenshot in your Digital Notebook (STL file uploaded to Google Classroom).
Day 2 Activity Log
Guidance: Focus on print-ready design choices. Mention size, thickness, and readability of text/details.
Describe your design idea
Sketch or outline your idea (you can draw here or attach an image)
Design Checklist
Reflection
1. What was the hardest part of designing your model?
2. What are you most excited to see when it prints?
Step 2: Import Model File (5 min) Assignment: Import your STL file.
Step 3: Configure Slicing Settings (10 min) Assignment: Adjust settings: Layer Height 0.2 mm, Infill 15%, No Supports, and record them in
Slicing Settings Log.
Step 4: Preview Layers and Predict Results (7 min) Assignment: Preview the print layers, save your 3MF file, then complete
Prediction.
Step 5: Submit for Teacher Review (5 min) Assignment: Insert your 3MF filename/link in your Digital Notebook Day 3 entry for teacher review before printing.
3MF note: upload file to Google Classroom, log
filename/link in Notebook.
Step 6: Start Print and Finalize Notes (5 min) Assignment: After teacher approval, start your print, then complete
Reflection and Before You Submit Checklist.
Deliverable: 3MF filename/link documented in your Digital Notebook, approved, and print started (3MF file uploaded to Google Classroom).
Day 3 Activity Log
Guidance: Enter actual slicer values, not guesses. Use units when possible (mm, %, minutes).
Slicing Settings Log
Setting
Your Value
Layer Height (mm)
Infill Percentage
Supports (Yes/No)
Filament Color
Estimated Print Time
Prediction: What do you expect your print to look like?
Reflection
1. How does slicing translate your design into printer instructions?
2. What setting do you think affects print quality the most? Why?
Goal: Apply your learning by remixing or improving your model.
Quick laugh: Today is your “director’s cut” — same idea, better version.
Objectives
Create and apply meaningful design improvements (
Evidence: Remix ideas + final summary).
Document how your final version changed from the original (
Evidence: Changes Made from Original field).
Reflect on your design process and your next version plan (
Evidence: Final reflection responses).
Success Criteria
I can explain at least three intentional design improvements.
I can show clear differences between my original and final version.
I can propose next-step improvements based on what I learned this week.
Steps
Instructional Flow: Learn (review + remix plan) → Practice (Day 5 activity log) → Submit (Before You Submit Checklist + Copy Day Notes).
Step 1: Choose Remix Direction (7 min) Assignment: Choose one: remix a model from Printables.com or improve your previous design.
Step 2: Redesign in Tinkercad (15 min) Assignment: Modify or redesign in Tinkercad, then record ideas in
List three changes or remix ideas.
Step 3: Export and Capture Evidence (8 min) Assignment: Export the final STL file, then take a screenshot of your new model.
Step 4: Complete and Submit Final Work (10 min) Assignment: Complete
Final Design Summary,
Final Reflection, and Before You Submit Checklist, then insert your final STL filename/link plus screenshot into your Digital Notebook Day 5 entry.
STL note: upload file to Google
Classroom, log filename/link in Notebook.
Deliverable: Final STL filename/link, screenshot, and reflection paragraph in your Digital Notebook (STL file uploaded to Google Classroom).
Day 5 Activity Log
Guidance: Show growth from your first design. Explain what changed and why those changes improve function or quality.
List three changes or remix ideas
Final Design Summary
Field
Details
Design Title
Description
Changes Made from Original
Final Reflection
1. What is one design decision you changed during this project, and how did that improve your final print?
2. What would your next version include, and what steps would you take to make it print successfully?